LVM, ext3 and xfs

I have two machines which are my original two CentOS 7 installs, which date back several years. At that time, I was running an old (now ancient) version of cobbler which had a history of blowing up when I tried updating to newer versions (more on that in a different, future post), and there was no support for RHEL/CentOS 7 installs using it. And I don’t mean that it was just missing the “signatures” and what defines an OS version to cobbler… the network boot just went ***BOOM*** as it was bringing up the installer. And having a new-to-me Dell PE2950III which could actually do hardware virtualization, and impatiently wanting to get it up, along with a VM to start playing with… I kinda painted myself into a corner. But that is a long story… and is a good lesson as to why patience is good.

Now is probably a good point to plan for Murphy, than to suffer a visit by the Imp of the Perverse… Actions such as verified backups, VM snapshots, or VM clones are ways to practice safe hacking…

One of the issues I have been having with the VM, which I have used for my development on RHEL/CentOS 7, has been the size of the / and /var filesystems. To say that they were “painfully small” is like saying that the crawler’s at KSC will give you a painfully very flat foot… 8GB for the root filesystem, and only 4GB for /var… and I never bothered to look into details until today, figuring I would just replace this VM after I figured out what all I had done over 18+ months of quick admin hacks (install this, change this, upgrade this….) on an ad-hoc basis with no notes… FAR from my old norm, where outside of say the contents of /home or a few files under /etc, all I had to do was tell cobbler and the host… “Reinstall this machine”, and come back a couple of hours later to find everything including my local customizations, third party software such as the eclipse IDE, etc. all reinstalled. But this machine…it had become the unruly teenager…

Here is what df was telling me… **AFTER** I told yum to clean its cache numerous times the past week…

# df
Filesystem              1K-blocks    Used Available Use% Mounted on
/dev/mapper/builds-root   8378368 7623100    755268  91% /
devtmpfs                  1923668       0   1923668   0% /dev
tmpfs                     1940604       0   1940604   0% /dev/shm
tmpfs                     1940604   25304   1915300   2% /run
tmpfs                     1940604       0   1940604   0% /sys/fs/cgroup
/dev/sda1                 1038336  227208    811128  22% /boot
/dev/mapper/builds-var    4184064 4028388    155676  97% /var
tmpfs                      388124       8    388116   1% /run/user/0

Since I was about ready to update my development WordPress installation on this machine. And so… time to grab the rattan and go beat this machine into at least temporary submission (and kick myself repeatedly in the process). And so we begin…

Just how big did I create the virtual disk for this VM??

While in cobbler, I have scheduled this machine to be rebuilt with a 64GB virtual drive, I was wondering how big it was at the moment. And so, I do this:

[root@cyteen ~]# virsh vol-info --pool default wing-1-sda.qcow2 
Name:           wing-1-sda.qcow2
Type:           file
Capacity:       64.00 GiB
Allocation:     24.51 GiB
[root@cyteen ~]# ssh wing-1 pvdisplay /dev/sda2
  --- Physical volume ---
  PV Name               /dev/sda2
  VG Name               builds
  PV Size               <16.01 GiB / not usable 3.00 MiB
  Allocatable           yes 
  PE Size               4.00 MiB
  Total PE              4097
  Free PE               1
  Allocated PE          4096
  PV UUID               LHhXlZ-jmk5-tYTN-Ql67-dwss-4GxB-wp9rj1
[root@cyteen ~]# ssh wing-1 vgdisplay
  --- Volume group ---
  VG Name               builds
  System ID             
  Format                lvm2
  Metadata Areas        1
  Metadata Sequence No  4
  VG Access             read/write
  VG Status             resizable
  MAX LV                0
  Cur LV                3
  Open LV               3
  Max PV                0
  Cur PV                1
  Act PV                1
  VG Size               16.00 GiB
  PE Size               4.00 MiB
  Total PE              4097
  Alloc PE / Size       4096 / 16.00 GiB
  Free  PE / Size       1 / 4.00 MiB
  VG UUID               xb9wg7-Tg8D-WV91-blt6-QCSK-2FyL-NMH5tp
[root@cyteen ~]# ssh wing-1 sfdisk -s /dev/sda
67108864
[root@cyteen ~]# ssh wing-1 sfdisk -l /dev/sda

Disk /dev/sda: 8354 cylinders, 255 heads, 63 sectors/track
Units: cylinders of 8225280 bytes, blocks of 1024 bytes, counting from 0

   Device Boot Start     End   #cyls    #blocks   Id  System
/dev/sda1   *      0+    130-    131-   1048576   83  Linux
/dev/sda2        130+   2220-   2090-  16784384   8e  Linux LVM
/dev/sda3          0       -       0          0    0  Empty
/dev/sda4          0       -       0          0    0  Empty

OK… 64GB, only 24GB of which are allocated… “What is go on? Stupid Live CD!!!” sums up my reaction… politely.

You Only Live Twice, Mr. Bond…

At this point, frustrated… I proceeded to check a few things, then do an ad-hoc fix. In retrospect… I should have also taken advantage of a feature of virtual machines and done a snapshot, but… something to remember next time… And this is a good argument for using scripts, as well as tools like cobbler and Ansible, and back-patching your scripts as you think of things you could have done better. But as is the case with this sorts of things, you expand from the outside in, and so… first, the disk partition table. While I have used various incarnations of fdisk, sfdisk and other tools for the partition table which is a part of the boot sector, right now, I am more fond of parted outside of kickstart scripts (a bit on that in another post about blivet, hopefully in the near future), and so, I do the following:

[root@wing-1 var]# parted /dev/sda
GNU Parted 3.1
Using /dev/sda
Welcome to GNU Parted! Type 'help' to view a list of commands.
(parted) p                                                                
Model: ATA QEMU HARDDISK (scsi)
Disk /dev/sda: 68.7GB
Sector size (logical/physical): 512B/512B
Partition Table: msdos
Disk Flags: 

Number  Start   End     Size    Type     File system  Flags
 1      1049kB  1075MB  1074MB  primary  xfs          boot
 2      1075MB  18.3GB  17.2GB  primary               lvm

(parted) unit s
(parted) p                                                                
Model: ATA QEMU HARDDISK (scsi)
Disk /dev/sda: 134217728s
Sector size (logical/physical): 512B/512B
Partition Table: msdos
Disk Flags: 

Number  Start     End        Size       Type     File system  Flags
 1      2048s     2099199s   2097152s   primary  xfs          boot
 2      2099200s  35667967s  33568768s  primary               lvm

(parted) resizepart 2 -1                                                  
(parted) p                                                                
Model: ATA QEMU HARDDISK (scsi)
Disk /dev/sda: 134217728s
Sector size (logical/physical): 512B/512B
Partition Table: msdos
Disk Flags: 

Number  Start     End         Size        Type     File system  Flags
 1      2048s     2099199s    2097152s    primary  xfs          boot
 2      2099200s  134217727s  132118528s  primary               lvm

(parted) q                                                                
Information: You may need to update /etc/fstab.
[root@wing-1 var]# partprobe

To sum up things, I use parted to print the old partition table, using both its “compact” units, and sectors, switching to the latter between the two commands. And then the resizepart 2 -1 says to resize partition 2 to end at the end of the disk (“-1”). Then I wrap things up with showing the partition table again and quitting parted. And lastly, the partprobe tells the kernel to reload the partition tables, just to be sure it has the latest information.

What’s next dedushka???

The next layer nested in this Matryoshka/Patryoshka (yes, there are male nested Russian dolls, which showed up during the Perestroika, and since I am a guy, and this post’s theme seems to be Bond…) doll is the LVM physical volume. For that, we have LVM to do the lifting for us. Here, we will follow the same pattern of show what we have, expand, reload and then show to verify.

[root@wing-1 var]# pvdisplay
  --- Physical volume ---
  PV Name               /dev/sda2
  VG Name               builds
  PV Size               <16.01 GiB / not usable 3.00 MiB
  Allocatable           yes 
  PE Size               4.00 MiB
  Total PE              4097
  Free PE               1
  Allocated PE          4096
  PV UUID               LHhXlZ-jmk5-tYTN-Ql67-dwss-4GxB-wp9rj1
   
[root@wing-1 var]# pvresize /dev/sda2
  Physical volume "/dev/sda2" changed
  1 physical volume(s) resized / 0 physical volume(s) not resized
[root@wing-1 ~]# pvscan
  PV /dev/sda2   VG builds          lvm2 [<63.00 GiB / <27.00 GiB free]
  Total: 1 [<63.00 GiB] / in use: 1 [<63.00 GiB] / in no VG: 0 [0   ]
[root@wing-1 var]# pvdisplay
  --- Physical volume ---
  PV Name               /dev/sda2
  VG Name               builds
  PV Size               <63.00 GiB / not usable 2.00 MiB
  Allocatable           yes 
  PE Size               4.00 MiB
  Total PE              16127
  Free PE               12031
  Allocated PE          4096
  PV UUID               LHhXlZ-jmk5-tYTN-Ql67-dwss-4GxB-wp9rj1

As you can see, the pvresize with just the partition says to expand it to the size of the disk partition, though we could have also expanded it only part of the way. And now, opening up to see the next layer, we have the volume group, which we need only check, and do not need to do a vgextend, as we would have had we created another partition at the disk partition table level.

[root@wing-1 var]# vgdisplay builds
  --- Volume group ---
  VG Name               builds
  System ID             
  Format                lvm2
  Metadata Areas        1
  Metadata Sequence No  5
  VG Access             read/write
  VG Status             resizable
  MAX LV                0
  Cur LV                3
  Open LV               3
  Max PV                0
  Cur PV                1
  Act PV                1
  VG Size               <63.00 GiB
  PE Size               4.00 MiB
  Total PE              16127
  Alloc PE / Size       4096 / 16.00 GiB
  Free  PE / Size       12031 / <47.00 GiB
  VG UUID               xb9wg7-Tg8D-WV91-blt6-QCSK-2FyL-NMH5tp

The disk is now enough…

Enough to give me some breathing room that is, and finish back engineering all my ad-hoc changes on this VM to allow it to die on another day. I can now expand /var to a more comfortable 16GB, quadruple what I started with. To do that, LVM has given us lvresize, and the filesystem has given us its own tool. And I am going to cover both of these together, and also address the growing scarcity of space on / as well. Think of it as an odd nesting doll, where at some point, you find two smaller dolls back to back (kinda like some onions do).

Were I using ext3 or ext4, things would be somewhere between somewhat more difficult to a pain in the six. This is because those filesystems either do not support what one might call “hot-growth”, where you can grow the filesystem without remounting it, or may only do so in limited cases… (honestly, after working with ext3, I followed the same path when it came to ext4, even though it may have worked with the filesystem mounted. But more often these days, I am using xfs… and it allows me to pull off a trick shot.

[root@wing-1 html]# lvresize -L 16g /dev/builds/var
  Size of logical volume builds/var changed from 4.00 GiB (1024 extents) to 16.00 GiB (4096 extents).
  Logical volume builds/var successfully resized.
[root@wing-1 html]# lvdisplay
  --- Logical volume ---
  LV Path                /dev/builds/var
  LV Name                var
  VG Name                builds
  LV UUID                sBnS4b-Bgrq-sIb0-f8Rz-67ey-UfR3-2FlUFv
  LV Write Access        read/write
  LV Creation host, time planys-test.home.ka8zrt.com, 2016-09-16 00:12:59 -0400
  LV Status              available
  # open                 1
  LV Size                16.00 GiB
  Current LE             4096
  Segments               2
  Allocation             inherit
  Read ahead sectors     auto
  - currently set to     8192
  Block device           253:2
[root@wing-1 html]# xfs_info /var
meta-data=/dev/mapper/builds-var isize=512    agcount=4, agsize=262144 blks
         =                       sectsz=512   attr=2, projid32bit=1
         =                       crc=1        finobt=0 spinodes=0
data     =                       bsize=4096   blocks=1048576, imaxpct=25
         =                       sunit=0      swidth=0 blks
naming   =version 2              bsize=4096   ascii-ci=0 ftype=1
log      =internal               bsize=4096   blocks=2560, version=2
         =                       sectsz=512   sunit=0 blks, lazy-count=1
realtime =none                   extsz=4096   blocks=0, rtextents=0
[root@wing-1 html]# xfs_growfs /var
meta-data=/dev/mapper/builds-var isize=512    agcount=4, agsize=262144 blks
         =                       sectsz=512   attr=2, projid32bit=1
         =                       crc=1        finobt=0 spinodes=0
data     =                       bsize=4096   blocks=1048576, imaxpct=25
         =                       sunit=0      swidth=0 blks
naming   =version 2              bsize=4096   ascii-ci=0 ftype=1
log      =internal               bsize=4096   blocks=2560, version=2
         =                       sectsz=512   sunit=0 blks, lazy-count=1
realtime =none                   extsz=4096   blocks=0, rtextents=0
data blocks changed from 1048576 to 4194304
[root@wing-1 html]# df
Filesystem              1K-blocks    Used Available Use% Mounted on
/dev/mapper/builds-root   8378368 7623060    755308  91% /
devtmpfs                  1923668       0   1923668   0% /dev
tmpfs                     1940604       0   1940604   0% /dev/shm
tmpfs                     1940604   25304   1915300   2% /run
tmpfs                     1940604       0   1940604   0% /sys/fs/cgroup
/dev/sda1                 1038336  227208    811128  22% /boot
/dev/mapper/builds-var   16766976 2487280  14279696  15% /var
tmpfs                      388124       8    388116   1% /run/user/0

The real magic is that xfs allowed me to to the exact same thing with /, without the need to boot from alternate media so that I do not have the logical volume and filesystem active. The only issue is, where I know the process to shrink an ext3 filesystem to a smaller size (which is riskier than growing it), everything I have read to date for xfs says it is a backup, tear-down, replace and reload. But you know what… I will gladly give up the ability to shrink if I get the ability to grow / without the prior hassles. Especially when it gives me this:

[root@wing-1 ~]# df
Filesystem              1K-blocks    Used Available Use% Mounted on
/dev/mapper/builds-root  16766976 7623284   9143692  46% /
devtmpfs                  1923660       0   1923660   0% /dev
tmpfs                     1940600       0   1940600   0% /dev/shm
tmpfs                     1940600    8932   1931668   1% /run
tmpfs                     1940600       0   1940600   0% /sys/fs/cgroup
/dev/sda1                 1038336  227208    811128  22% /boot
/dev/mapper/builds-var   16766976 2640112  14126864  16% /var
tmpfs                      388120       4    388116   1% /run/user/0

And now, for a Quantum of Solace…

While I still have lots of things to deal with in the future, at least I have a tiny bit of comfort in knowing I am not going to be banging my head on an undersized filesystem in doing so… I have enough to worry about without having to somehow having to limp along or otherwise suffer. And with luck, and a new $job, maybe I can take a few hours to hack a few custom buttons (or a dropdown for them) into the new WordPress editor, such as for marking up commands, filenames, and the like, without having to constantly shift over to editing the blocks as HTML to put in what is normally simple, inline markup.

Cobbler and kickstart repositories

If you have not figured it out, I am a strong proponent and user of cobbler and kickstart installs. It is rare these days that I build a machine in what one might call a “hands-on” mode, whether using a Live DVD/USB flash drive, network install, or any other media. Indeed, I am even for the RHEL 8 beta install I have planned in the next 48 hours going to use cobbler and a kickstart install, where I will pull the trigger and come back in an hour or so to find everything installed and updated just the way I would a RHEL/CentOS 7 install, or most any other install I would expect to do. This is because when I was working at CompuServe, Bell Labs Messaging and later a network switch manufacturer, not only was I providing means for engineers, operators and folks on the factory floor of the latter to install the OS with minimal knowledge and effort, in my daily tasks, I needed to be able to do the same. And so, anything beyond perhaps a couple of quick commands and perhaps turning on the hardware was inefficient and “too much” in my professional opinion.

I will admit, there have been times this has not been easy… a new OS version which is not yet recognized by cobbler may take some time to be officially recognized by a released version is the most common. But over the past 24 hours, I found a new issue, for which I am going to start a discussion on the cobbler developer mailing list (which I will need to rejoin). The problem is that while cobbler allows you to specify a list of software repositories to use during your install, the mechanism used in placing those into the kickstart file sent to the machine being installed is an oddball in how it has been done which has become not only dated, but outright broken.

Cobbler has the ability to use templates and snippets to produce things like the kickstart file, or the various files it produces for maintaining the DHCP and DNS server. What is the difference between templates and snippets?? Personally, I would say that there is none…zilch, nada, nichts, rien, ничего, 別. Mathematically, if we have S represent what you can do with snippets and T represent that for templates, I would express it as S ⊖ T = Ø. I think the only “difference” is that templates are the term used for the top level snippet. But for the repository info used in the kickstart file, along with the similar information used during the configuration step, these are done by something else entirely. For these, cobbler uses a legacy mechanism called stanza’s, which go clear back to at least some 1.x version from the days when Michael DeHaan was maintaining it (which was when I first started using it, though I remember using the 0.x releases with x no higher than 4). The stanzas are actually produced by functions in the code itself, and not able to be changed without changing the code itself. As of right now, there appear to be only two such stanzas remaining: $yum_repo_stanza and $yum_config_stanza. And in a kickstart template, it might look something like this:

...
#
# Add in any cobbler repo definitions
#
$yum_repo_stanza

#
# System timezone
#
timezone --utc America/New_York
...

But, as I said, there was an issue with this, since it only provided the repo kickstart command with the name and URL, while both cobbler and kickstart have other information associated with them, such as what cobbler and the repo definitions themselves refer to as “priority”, but which the kickstart repo command calls more correctly “cost”. Why “cost” instead of “priority”? Because everywhere, it talks about how the repository with the lowest value is the one used, while “priority” would pick the one with the higher value. To fix this, I created snippets/yum-repos, which looks like this:

# My custom repo stanza
#for repo in $repo_data
repo --name=$repo['name'] --baseurl=$repo['mirror'] --cost=$repo['priority']
#end for

This changes the usage to this:

...
#
# Add in any cobbler repo definitions
#
$SNIPPET('yum-repos')

#
# System timezone
#
timezone --utc America/New_York
...

The result renders to this:

# Add in any cobbler repo definitions
# My custom repo stanza
repo --name=centos7-x86_64-local-secure --baseurl=http://mirror.ka8zrt.com/local-secure/centos/7/x86_64/ --cost=90
repo --name=centos7-x86_64-local --baseurl=http://mirror.ka8zrt.com/local/centos/7/x86_64/ --cost=90
repo --name=centos7-x86_64-extras --baseurl=http://mirror.ka8zrt.com/centos/7/extras/x86_64/ --cost=99
repo --name=centos7-x86_64 --baseurl=http://mirror.ka8zrt.com/centos/7/os/x86_64/ --cost=99

# System timezone
timezone --utc America/New_York

And so, with this, I can now do an installation where I create a local replacement for a package and have it used instead of the original, which in this case is a revised version of the setup-2.8.71-10.el7.noarch package, where I need only change the el7 to my ka8zrt-el7 when I generate the package. And when all is said and done, and the install the rpm -q -i command will still show something like the following…

Name        : setup
Version     : 2.8.71
Release     : 10.ka8zrt.el7
Architecture: noarch
Install Date: (not installed)
Group       : System Environment/Base
Size        : 697090
License     : Public Domain
Signature   : (none)
Source RPM  : setup-2.8.71-10.ka8zrt.el7.src.rpm
Build Date  : Fri 28 Dec 2018 06:23:12 AM EST
Build Host  : builds.home.ka8zrt.com
Relocations : (not relocatable)
URL         : https://pagure.io/setup/
Summary     : A set of system configuration and setup files
Description :
The setup package contains a set of important system configuration and
setup files, such as passwd, group, and profile.

So, having built the new version of the setup package (as you might have guessed from the output above), and made the update to my kickstart template, I have done the following command 1

norway# koan --system=loki --virt --force-path

and when I wake back up, we shall see how this test install has worked out.


1Bonus geek points to anyone who gets the references…

tito, mock, and building software

Granddaddy built houses for decades, and while I don’t think I heard the adage from him, I learned all about using the right tool for the job growing up, between what I learned from Mom, and from what I learned through personal experience. For example, it is quite obvious that you don’t use screwdrivers for driving nails into boards, but then you are faced with all the different hammers, all slightly different, for driving a nail… and we have not even considered the size of the nail. And sometimes, even with all those choices, we are left unaware that there is an even better tool out there which is as better suited to the job as the worst hammer is over the screwdriver. The same is true in building software and installing it on your computer.

Some history

Now, over the years, I have dealt with this in so many ways. In what might as well have been the Dark Ages, we would take files off of magnetic tape, do what might as well have been incantations, and in the end, have the software running on our system… hopefully… It did not always work out that way. Missing a compiler flag, having the wrong library, or the wrong version… so much could go wrong. Improvements were inevitable, especially when you had some of the brightest minds using something which could do something over and over, far faster than we could, and make far fewer mistakes, other than reproducing the garbage we sometimes put into the process. And for each machine on which we wanted that software, odds were, we were repeating that process on each and every machine. So we started using shell scripts, makefiles, and other items… but there was even more lacking. Did we have a given package installed, and was it the right version?? And so we made package managers, to the point where today they are coming out our ears (or elsewhere). And each platform, both hardware and OS, seem to come with their own, and then some. I have used proprietary package managers on OSes like SunOS/Solaris, AIX, and HP/UX , more open managers such as NetBSD’s pkgsrc, and these days, mostly use Red Hat’s RPM with tools such as Yum. But then, certain languages such as Perl, PHP and Python (which I have used since their earliest days) are generally platform independent once you have the core language engine (executable/interpreter) installed, and they have their own internal packaging, and centralized repositories. Perl’s cpan command, PHP’s pear, pecl and composer, and Python’s pip all come into play here, but do not integrate outwardly with the OS package manager. And so, we are at times still forced to some extent to re-live the dark ages. But that is a different topic and a different post (or series thereof).

RPMs… how do we get there??

Every package manager works to reduce the headaches of what OS version are we using, what CPU architecture are we using, and what else do we need to have installed to run it. But depending on some of those details, we may find what comes off the shelf to be frustratingly lacking. Henry Ford said one morning “Any customer can have a car painted any colour that he wants so long as it is black.”. And this was definitely something old Ma Bell/Western Electric took to heart. The model 302 telephone was almost exclusively black… though since the phone was owned by the phone company (it was a part of your monthly phone bill), they did realize that there was some extra profit if they painted them a few different colors. But even in the 1960’s, a decade after the introduction of the model 500 with its 36 different colors, unless you were were a company with a good reason, odds were that your phone was black. It really was not until the 80s that we got the real choice of colors. And the same is true of software. If you have a LTS (long-term support) version of an operating system, you could go years without an update you wanted, because for support organizations, often times it is considered to be better to patch problems and not introduce newer problems with newer version, than it is to just move to the newer version. Or perhaps you find yourself wanting a particular option enabled, and being like an individual who wanted a white Model T. But then, one of the great things about Open Source is you can get around things like that, if you opt to do so. But to do so, we need to know what our tools are.

At the core of the RPM toolbox, we have tools such as rpmbuild. This is far better than the earlier tools, but can still leave you with an involved process, even with newer tools like yum-builddep to help. And like the old pkgsrc days in NetBSD, you either find yourself with everything and its brother installed on your system, or having to use tricks like chroot or today’s containers to make it so that you can go back to a “stable” starting point. You can almost think of this as mowing your lawn with one of these…

It is ok for occasional one offs or simple things, but soon, you find yourself trying to do things a better way.

And what this still leave you with is how to get the package installed onto your system. At the end of doing your rpmbuild, you have a RPM file which may need to go onto one host, a dozen hosts, or maybe thousands, starting from when you have that installable RPM. And while you might be willing to copy that file to a few hosts and run the command to install it (which gets simpler with things like Ansible playbooks/roles), it makes far more sense to use the tools used for distributing the OS and its updates, which brings in the createrepo tool.

When doing things by hand just does not cut it…

Yes, you saw what I did there… Just like when your yard is too big, or you have to do it far too often, you find yourself wanting to make things easier for yourself, and justifiably so. But at the same time, how many of those attempts just get us something we will think is great a year or two down the road, and how many will we end up thinking “WTF was I thinking??!!”, given how many of them can turn out to be real Frankenstein’s monsters. (I actually remember seeing a video of such a reel-style lawn mower, but could not find a video/picture, which seemed like 1/2 go-cart, 1/2 dragster, 1/2 lawn mower and 150% monster straight out of a horror movie or Mythbusters…)

Yes, sometimes, we get things right. I have a few such tools sitting in my old toolbox, which were I to start using a NetBSD distro today, would just take a few tweaks, and after some hours of compiling, I would find myself with a running configuration, complete with familiar editors and all. But at other times, we find ourselves at the other end of a totally different mower. After all, just because we find ourselves able to graft wings onto a male bovine does not mean that it will be able to fly. It may slice, it may dice, it may julianne… but it will also quickly take your finger off. And so, let us first take a simplified look at the core process we are doing here…

When you look at this, it looks simple, but realize that the chain of rpmbuild through publish is repeated for each combination of (distribution, version, architecture), and the install is replicated for each machine. And this last step is what drove the whole packaging things as RPMs, Python “eggs” or other forms clear back in beginning.

So how bad is this? Well, for me, it potentially means 8 separate times through the valley of builds, to say nothing of the deployment, which for me is almost two dozen machines (that number may vary, as I can spin up virtual machines in relatively short order, or destroy ones used for testing in moments. And depending on what I am doing, maybe I have to rebuild a package from scratch for every one of those distro/architecture combinations. And let me say right now, there are things I would far rather do than go through that process multiple times. And when you add in setting up the build environments on top of that… ACK!

Tools to the rescue…

Fortunately, there are two good tools out there, which have come about thanks to folks who do the builds for Fedora. The first of these is mock, which comes straight from the team maintaining tools such as rpm, createrepo, yum, dnf, and other goodies. That team includes several folks from Red Hat, and at least one from SUSE, both vendors using the RPM package format for distributing their software. The mock tool focuses almost entirely on the rpmbuild step, and the setup surrounding it. That may not seem like much at first, but when you look at what it takes to setup the build environment (create a chroot environment, install all the things needed to do the build into the chroot, making sure everything is updated in that environment, and perhaps checking out the source code and building the source archives used by the rpmbuild command), having such a tool for that alone is a blessing. And with all of that, the hardware permitting, just minor changes in the command line can have me building packages for a different OS release (e.g. RHEL 6 instead of RHEL 7, the upcoming Fedora release, or openSUSE), or a different processor (e.g. the i386 instead of the x86_64). It looks like it will even support true cross-compiles such as for the ARM or PPC processors done on the x86_64 host… but I have not tried that. (I used to do something similar with NetBSD, building binary distributions for the Sun 3, HP 700 and PPC processors on a box with the Athlon 2500+ CPU, and this is how we also built the firmware for PPC based network switches at a former employer). So that simplifies the rpmbuild step, but does not handle the other steps, particularly if I want to have everything 100% automated, such as by a job which runs in Jenkins any time I do a code commit (such as deciding I am going to have a new persistent virtual host for a new web server). For that, we have tito.

The author of tito is another individual at Red Hat, Devan Goodwin, and his work takes some of the other tasks in that blue box I labeled “Build”, and pulls them all together, with some additional niceties. These include handling tagging releases in git, doing the copying and doing the publishing steps associated with a release for a number of different build/release platforms such as copr/koji, or directly to Yum repositories maintained via rsync, and even producing initial builds and and RPMs. There are some things I would definitely have done differently, but such is always the case… no matter how much we talk about how Great minds think alike, it does not always work out that way… at best, there is a synergy which forms, allowing something better than the individuals would produce by themselves to result from their working together. As a result, I have forked his project (one of the great things about Open Source) to make a few changes which are definitely being fed back to him, primarily starting with local Yum repositories (no need to rsync if you can avoid it, and there are times you definitely do not want to do so), and depending on the response I get on some other items, some of my other ideas will either go forward in my own version, or get pulled into the master project. As I had driven home while working at Bell Labs on a project which was aiming for TL9001 after years of working under ISO 9001, there is always room for improvement.

What else is there?

There are two really big goals once I finish up the initial coding for the enhancement for local Yum repositories. These deal with what is called Continuous Integration/Continuous Deployment (CI/CD), and are:

  • Automatic builds within Jenkins triggered by commits to both my forked project, but also using the same for other projects. (e.g. “Dogfood” my own work, otherwise, why would I have done it??)
  • Doing the builds within docker containers, which are yet another step up from the chroot environment of mock.
  • Build success notification.
  • Upstream repository merges into my forked repository, with automatic integration testing.

Following the theme… I want a lawnmower the size of a combine, which handles all the things I would normally do for these tasks, without me even having to drive… (and of course, powered by solar, wind or a Mr. Fusion eventually as well. 🙂 )


A bit of an afterword here… This is my first post using WP 5.0 and the new Gutenberg editor… While there are some things which are nice about it, there are others which I find frustrating. Probably the biggest one of this post is the difficulties surrounding inline formatting. While I have the “buttons” up top for bold (<b></b>), italic (<i></i>), and strikethrough (<del></del>), the lack of equivalents for me to ease the use of code (<code></code>), keyboard (<kbd></kdb>), sample output (<samp></samp>) and variables (<var></var>), along with short quotes (<q></q>) is frustrating. Nor does it look like they are there, just waiting for me to learn the key sequences. But hey… WordPress is Open Source, and so… 🙂

Jenkins, git plugin, and git tags

The past couple of weeks have been filled with lots of little “I need to do X, but to do X, I first need to do Y, and to do that I need to do Z” type tasks. One of those items was learning about and then writing a new Releaser plugin for tito. More on it specifically in a post to be written shortly, but now that I have my client SSL certificate updated in my browser (yet another upcoming post), I can write this post to talk about an issue I had while working with tito and Jenkins.

The problem

My goal at the time was to start automatically producing local versions of the tito package any time I did a commit to one of my branches. To do this manually for an actual “release”, one does it with the following command:

tito build --rpm

Yep… you build the package using the package itself, and is not unlike using the compiler to compile itself, then using that new executable to build the rest of the UN*X operating system. This is something I had automated decades ago, and did on a regular basis, even at one point triggering it off the email which CVS would send when I committed a change. And at CompuServe, I used to automatically deploy these changes if there were no compile errors to test machines. And while I could certainly do similar things today myself… why be stupid and reinvent the wheel, unless one needs a very non-standard wheel. But here, we come into one of those “to do X, first we must do Y” points.

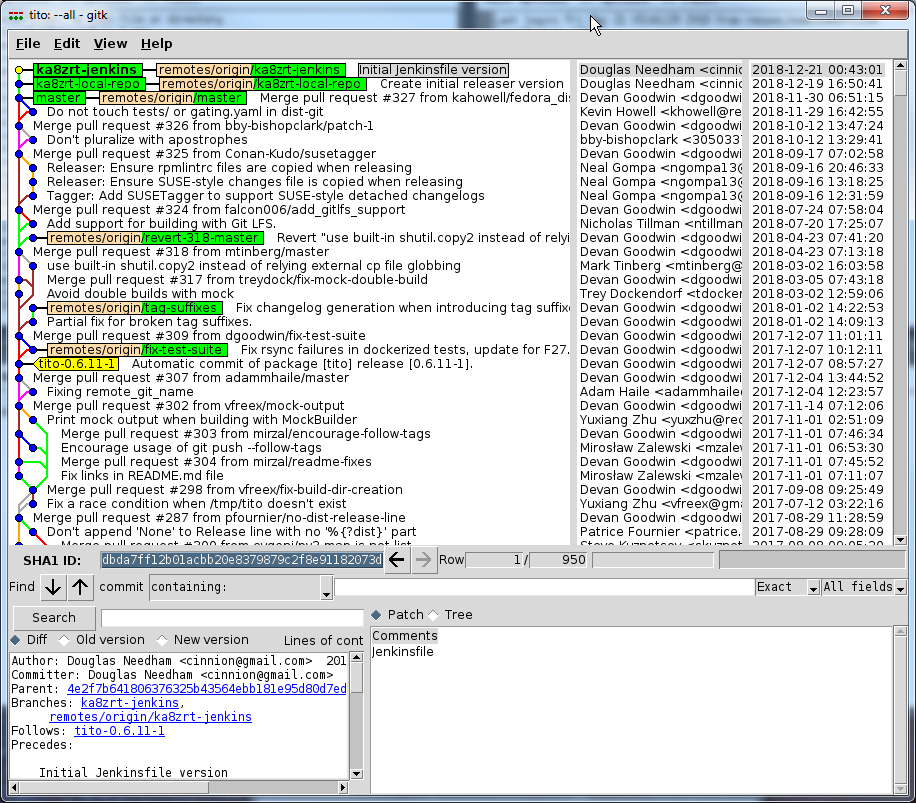
When building a non-release version using tito, one must run a slightly different command. Here, using git‘s gitk utility, we see various “revisions” of the code, with each of the blue dots on what I think of as a rail yard network, with the rest of each dot’s corresponding line representing a change.

The reason for the slightly different command is because without an additional argument, tito looks for the most recent tag, and rather using the head of the branch, it does everything at the point of that last tag. This means that if I were wanting to build a test version of the code as it existed at the ka8zrt-jenkins branch at the top of this image, it would be instead be rebuilding things where the yellow tito-0.6.11-1 tag is… each and every time. Handy if you are only interested in installing it by hand yourself, such as when all the repositories you use are running behind, but for someone doing development of a package, it is something you must remember. And so, I need to instead run the following command:

tito build --test --rpm

The trick is, I need to have the file used by Jenkins aware of all the tags… only as of version 3.4.0 of the Jenkins Git Plugin, they made a change to stop pulling down the tags by default. Part of me can see why they might do this, but it means that I must make changes to deviate from the default behaviour… and unfortunately, they don’t do a good job of documenting what needs to be done, particularly given how greatly pages may differ from job to job, based on what appears to be the job type.

GitHub Repository Jobs

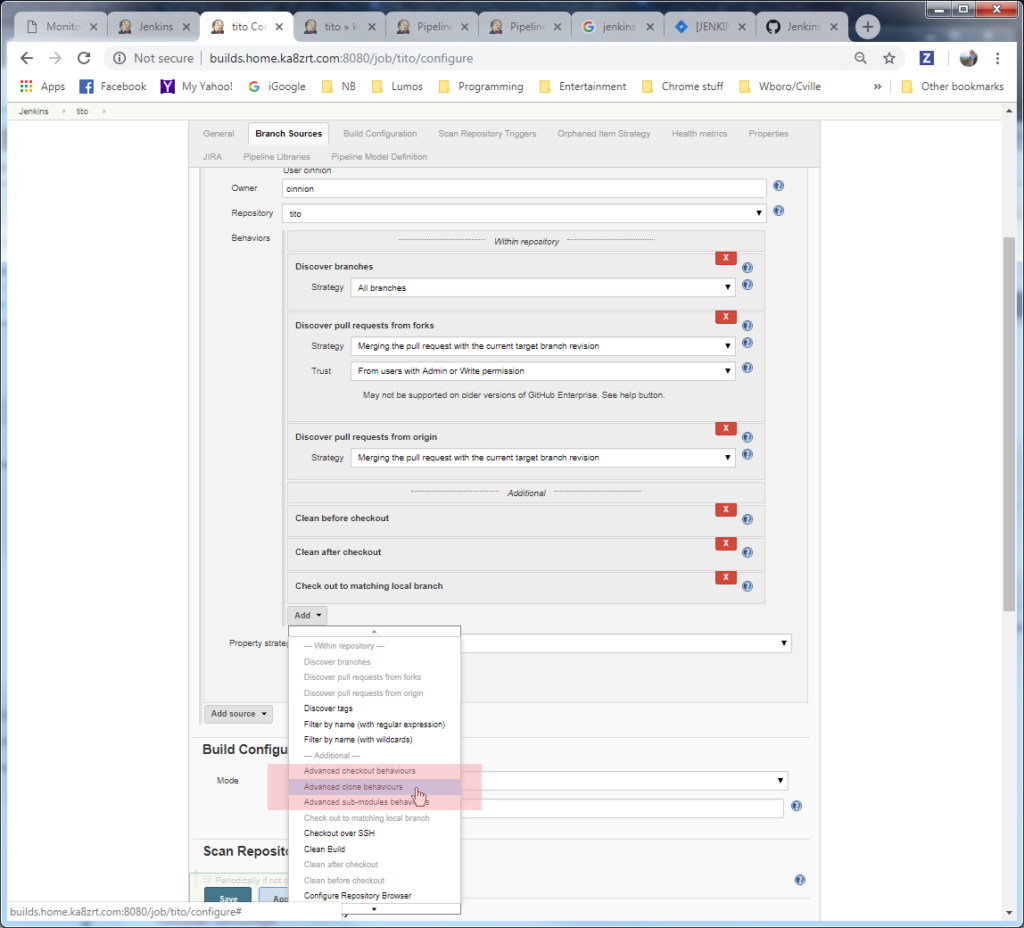
What needs to be done is this. If you go into the job, and click on the Configure link (either on the dropdown for the job on the dashboard, or in the menu on the page for the job), it will bring up a page which a number of “tabs” (to truly be tabs, the others would either compact or disappear entirely) for the job ranging from General settings, to Branch Sources, Build Triggers, and other sections. Then going to the Branch Sources section of the GitHub Repository job, scrolling down through the section, we find a Behaviours subsection, with an Add button at the bottom. Clicking on it, we see the following, with Advanced Clone Behaviors picked in the list (highlighted below).

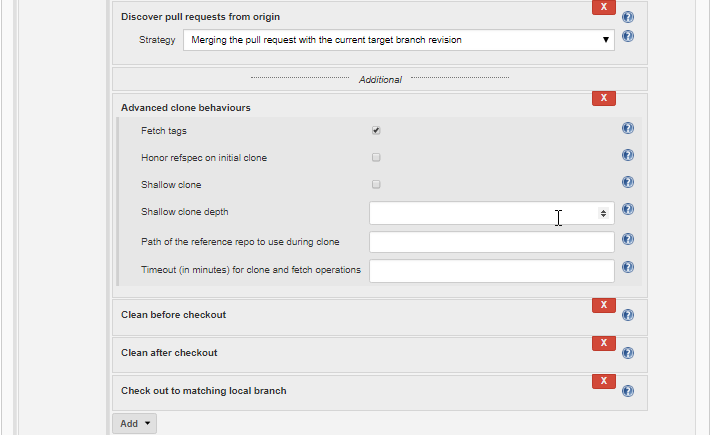
Selecting that item, we get a new subsection, seen here:

Note the top item in the new section, labeled Fetch tags, which is checked. This is what will allow the tags to be fetched, and for the Jenkins job and tito to be able to do their thing.

Pipeline Jobs

For a regular pipeline job, the Add button is at the bottom the Pipeline section of the screen. As before, clicking on that button presents a dropdown list, from which Advanced Clone Behaviors is picked to add the corresponding subsection.